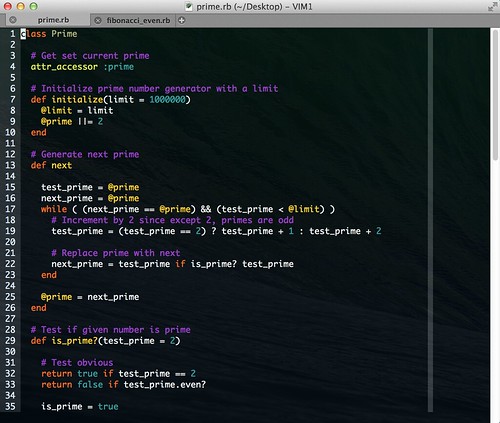
VIM Reloaded
It’s been a really really long time since I
last blogged so bear with me while I try get a little bit of my mojo
back :) I’ve been busy changing countries, cities, apartments, jobs –
the usual stuff life throws at you. But the one thing I’ve tried to
change and keep coming back to is my beloved editor – VIM. This post is
on making VIM a little better, like that other one
developers tend to use these days. Don’t get me wrong, I’m not
suggesting VIM is better (or worse). But after having used VIM for so
long, I don’t want to just give up on it. If you’re in the same camp
then read on.

There are a ton of other tips that can make VIM so much better for coders such as folding code blocks or visually showing marks made via ma, mb etc.. Chances are, if you can think of a feature you’d like to have, there’s probably a plugin or built in to make that happen!
I’ll leave you with this great post which has few more useful tips.
~Happy VIMing~
Get me some of that WYSIWYG
I know what you’re thinking – VIM is awesome because its all terminal. And there is no reason to give that up! I haven’t, especially for those quick edits. However when it comes to coding for any length of time, my goto editor has been one where VIM is wrapped in WYSIWYG goodness. I’m talking about the likes of gVim alternatives such as vim-gnome (Linux Gnome), vim-gtk (Linux) or macVim (OSX). Pick one depending on the platform. I use gnome-vim on Debian and macVIM on OSX.For Debian based…
$ sudo apt-get install vim-gnome
For OSX visit macVIM siteAnd so the fun begins! First I’ll show you how I got tabs working in a helpful manner where each file you opened from the command line would open up as a new tab within the same session window. This was easily accomplished using a specially crafted alias which was placed in the
bash_profile (or bashrc) file.alias gvi='mvim --servername VIM --remote-tab-silent'
gvi /etc/passwd /etc/hosts
gvi ~/.bash_profile
command + shift + ] and command + shift + [
key stokes on OSX which work out of the box on macVIM. However on Linux
to get a similar functionality, I had to add a special key mapping to ~/.gvimrc. Since I wanted to keep the same feel as on OSX, I substituted the alt key in place of command key found on Macs.~/.gvimrc
" Map tab switching
map  gt
map  gT
gt and gT commands to switch between next and previous tab by mapping it to shortcut keys.Add some color
While the default color scheme that comes with vim is pretty straightforward, it lacked the vibrant and cheerful syntax highlighting found in those other editors. Not a problem though, thanks to Vim Color Schemes. My favorite one, which I ended up using was Vividchalk. Simply download the color theme file of your choice (such as vividchalk.vim) to~/.vim/colors/ and set it via .gvimrc.~/.gvimrc
" Set color scheme
syntax on
set background=dark
colorscheme vividchalk
" Optionally set font and transparency
set guifont=Monaco:h13
" set guifont=Monospace\ Bold\ 10.5
set transparency=15
Better searching
Searching is an important part of editing and so there are few things we can do to improve VIMs default search capabilities." Search related
set incsearch
set hlsearch
set ignorecase
set smartcase
incsearch makes search incremental so that
as you type the search keyword (via /keyword in command mode), VIM will
start highlighting and transporting you to that location. hlsearch is useful in that it highlights all keywords matching the search criteria. The last two, ignorecase and smartcase
together provide a smarter way to search by making any keyword typed
all in lowercase to be a case insensitive search while still retaining
case sensitivity for mixed case (e.g /FooBar won’t find foobar but
/foobar will find bothFoobar and foobar)Few more enhancements for coders
I’ll close off with a few more enhancements that can come in handy when writing code. First is to turn on line numbers by default and it looks great with my color scheme. I also prefer seeing a vertical guide fixed to 80 characters in order to keep me in check as to the length of my code. Along the same line, its also a good practice to catch those trailing white spaces which can appear ugly when viewed through a visual diff tool. Finally having auto completion turned on may come in handy, especially if you suffer from short term memory like I do :)~/.gvimrc
" Show line numbers
set number
" Show 80 column guide
set colorcolumn=80
" Highlight trailing spaces
match ErrorMsg '\s\+$'
" Auto completion
setlocal omnifunc=syntaxcomplete#Complete
filetype plugin on
autocmd FileType html set omnifunc=htmlcomplete#CompleteTags
autocmd FileType javascript set omnifunc=javascriptcomplete#CompleteJS
autocmd FileType css set omnifunc=csscomplete#CompleteCSS
autocmd FileType php set omnifunc=phpcomplete#CompletePHP
" Ruby autocompletion
autocmd FileType ruby,eruby let g:rubycomplete_buffer_loading = 1
autocmd FileType ruby,eruby let g:rubycomplete_classes_in_global = 1
autocmd FileType ruby,eruby let g:rubycomplete_rails = 1
Ctrl-X Ctrl-O
combination while on the insert mode. Besides using language specific
auto completion, vim also supports a smart auto completion which relies
on text already found in the document being edited, which can be
activated using Ctrl-N after typing part of the word. It is quite useful when you want to retype a previously declared variable or method name.
There are a ton of other tips that can make VIM so much better for coders such as folding code blocks or visually showing marks made via ma, mb etc.. Chances are, if you can think of a feature you’d like to have, there’s probably a plugin or built in to make that happen!
I’ll leave you with this great post which has few more useful tips.
~Happy VIMing~

Comments